ESP32 Sound Detection Sensor with Arduino IDE
## Introduction The sound sensor module is a great tool for detecting sound levels and is perfect for projects like sound-activated lights or alarms. It features a microphone and provides an **analog output** that reflects the ambient sound intensity. This guide will show you how to **connect the so
#Introduction
The sound sensor module is a great tool for detecting sound levels and is perfect for projects like sound-activated lights or alarms.
It features a microphone and provides an analog output that reflects the ambient sound intensity.
This guide will show you how to connect the sound sensor to an ESP32 and read sound level values accurately using the ADC (analog-to-digital converter).
#Required Components
- ESP32 Board
- Sound Sensor
- LED
- 220 Ohm Resistor
- Jumper Wires
- Breadboard (optional)
#Pinout

#Circuit Diagram / Wiring
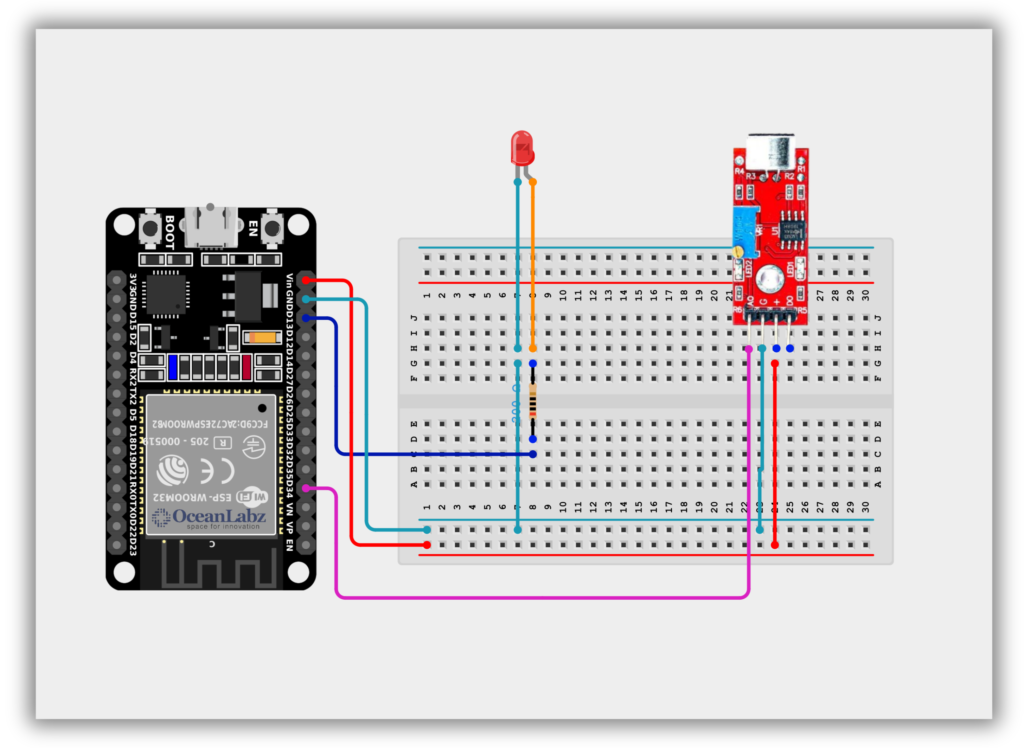
- SOUND SENSOR
- SOUND SENSOR VCC → VIN, 3.3V (ESP32)
- SOUND SENSOR GND → GND (ESP32)
- SOUND SENSOR AO (Analog Output) → Pin 34 (ESP32)
- LED
- Connect the longer leg (anode) of the LED to digital pin 13 through a 220-ohm resistor.
- Connect the shorter leg (cathode) to the GND pin.
#Code / Programming
/*********************************************************************** * Filename : sound_sensor_led_alert.ino * Description : ESP32 reads analog sound level from a sound sensor on GPIO34. * If the sound exceeds a defined threshold, an LED connected * to GPIO13 lights up for a short time. * Author : www.oceanlabz.in * Modification: 1/4/2025 ***********************************************************************/
const int LED = 13; // Use any valid GPIO pin for the LED (e.g., 13) const int Sensor = 34; // Use an ADC-capable pin on ESP32 (e.g., GPIO 34)
int level; const int threshold = 640; // Adjust based on your sound sensor's response
void setup() { pinMode(LED, OUTPUT); Serial.begin(115200); }
void loop() { level = analogRead(Sensor); // Read sound level Serial.println(level); // Print value for debugging
if (level > threshold) { digitalWrite(LED, HIGH); // Turn on LED if sound level is high delay(1000); digitalWrite(LED, LOW); } else { digitalWrite(LED, LOW); } }
#Explanation
- The sound sensor detects ambient sound levels and sends an analog voltage to the ESP32.
- The ESP32 reads this value using its ADC pin (e.g., GPIO 34) and compares it to a threshold.
- If the sound level exceeds the threshold, the LED turns ON as an alert or response.
#Troubleshooting
- Make sure the sensor is connected to an ADC-capable pin (e.g., GPIO 34, 35, 32, or 33).
- Use Serial Monitor to observe real-time analog values and adjust the threshold accordingly.
- If the LED doesn’t respond, verify the sensor’s VCC and GND connections and confirm the LED is wired correctly.
#Project 1: ESP32 Web-Based Audio Waveform Visualizer
#Introduction
This project uses an ESP32 and a sound sensor (microphone) to visualize real-time sound waveforms on a web interface.
The ESP32 reads analog sound data from the microphone, samples it, and sends it to a browser via WiFi.
A built-in web server displays the audio signal as a live waveform on a canvas using HTML and JavaScript.
This is ideal for learning about audio sampling, analog sensors, and web-based IoT visualization.
It's a creative and educational project combining sound sensing and real-time web visualization.
#Required Components
- ESP32 Board
- Sound Sensor
- Jumper Wires
- Breadboard (optional)
- Wi-Fi Network (2.4 GHz)
#Code / Programming
/*********************************************************************** * Filename : esp32_audio_waveform.ino * Description : Reads analog values from a microphone on ESP32 (GPIO34), * serves real-time waveform data via WiFi and visualizes * it on a browser using a canvas. * Author : www.oceanlabz.in * Modified : 1/4/2025 ***********************************************************************/
#include <WiFi.h> #include <WebServer.h>
const char* ssid = "YOUR_SSID"; const char* password = "YOUR_PASSWORD";
#define MIC_PIN 34 // Analog input pin for microphone #define SAMPLE_COUNT 200 int samples[SAMPLE_COUNT];
WebServer server(80);
void handleRoot() { String html = R"rawliteral(